PC won’t turn on
How to boot to USB drive from Dell Alienware Aurora R16?
You can enter the One Time Boot menu, turn on your computer, and then press F12 immediately.
Checking External Connections
Start by checking the power connections outside the PC. Make sure that the power cable is securely plugged into the back of the PC and that the switch on the back is in the “I” position.
Next, check and make sure that the cable is securely plugged into the wall outlet or surge protector. Also check and make sure that the surge protector is switched to the on position if you are using one
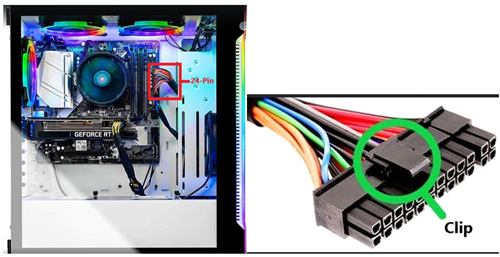
Checking the 24-Pin Connection
If all external connections are secure and issues still persist the issue could be related to a loose connection on the 24-Pin cable.
Before beginning any of the following steps make sure to unplug the power cable from the back of the PC and flip the switch on the power supply to the off position.
Start by removing the side panel of the case so that you can access the internal components of the PC.
Once the side panel of the case is removed, locate the 24-Pin connection on your motherboard. The 24-Pin will be located directly to the right of the RAM on the far right edge of the motherboard.
Next, unplug and reseat the connection of the 24-Pin cable. To unplug the cable you will need to squeeze the clip that is latching the cable into place. Once the clip is pressed down pull the cable out of the plug on the motherboard. If the cable is difficult to remove you can gently wiggle the cable from top to bottom to help loosen the connection as you pull outward on the cable.
Once removed, go ahead and plug the cable back in making sure that it is seated securely and the clip is locked into place. Then check to see if the PC will power on.
Checking for Defective Power Supply
If the PC is still not powering on the next step is to start checking power supply.
Before beginning any of the following steps make sure to unplug the power cable from the back of the PC and flip the switch on the power supply to the off position.
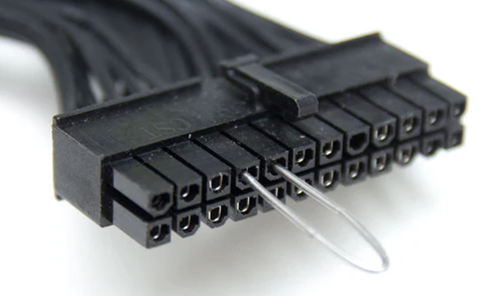
Remove the 24-Pin connection again and get a paperclip. Then unfold the paperclip and bend it into a “U” shape and place one end of the paperclip into the 4th pin and the other into the 5th pins on the top row of the 24-Pin cable. The top row will be the side with the clip on it.
Once the paperclip is in place, make sure your hands are clear of the case fans and then plug the power supply back in and flip the switch to the on position.
If the case fans or the fan on the power supply spin then it is likely not an issue with the power supply. If no fans start spinning after flipping the switch then the cause is likely a bad power supply.
Checking Power SW
If the power supply test shows that it is working, the next step is to find out if there is an issue with the power button on the case.
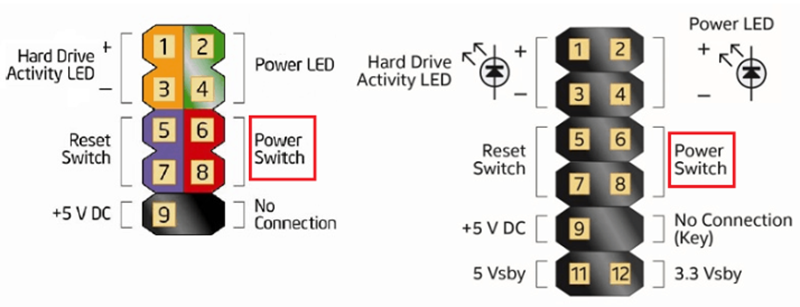
In the bottom right corner of the motherboard you should see a small set of pins with some very small wires plugged into them.
On the top row of pins on the right unplug the PowerSW cable. It should be pins 3 and 4 on the top row if you count left to right. Once the cable is removed go ahead and make sure that the PC is plugged into power and the power supply switch is in the on position.
Then using a small screwdriver, bridge the connection between two power pins that the PowerSW cable was plugged into. If the PC powers on then either there is an issue with the power button on the case or the connection may have been loose or plugged in incorrectly.
Go ahead and plug back in all of the connections to make sure that everything is connected properly and try the power button on the case again. If you were able to start the PC with the screwdriver, but the PC is still not powering on with the power button then the front panel I/O will need to be replaced.
Clearing the CMOS
Make sure that the PC is powered off and disconnected from power before proceeding to remove the graphics card or the battery. Once you have located the battery, removing it is as simple as pushing the metal tab that holds it in place open and then removing it.
Then wait about 5 minutes and reinstall the battery. Once that is finished try to power on the PC again.
Example of my case
- When press the power button, nothing happens
- Touch the power pins(6,8) with a metal screwdriver it works well and can turn the computer off using the power button.
- Checked the power cable from front panel and found that it connected to the wrong pins. Reconnect it to the power pins and the power switch works.
Black Screen
When turned the HP laptop on, you can hear the fans, HDDs are working but the screen is black.
Step 1:
- Turn power off and remove unplug the power cable
- Remove power cable and battery from laptop
- Hold power key about 15 seconds
- Connect the power cable to see if there’s any display
Step 2: If step 1 fails, connect a monitor to the laptop to see if the display adapter is OK. If the other monitor works, update the display driver and the laptop monitor may works.
Step 3: Reinstall memory card and other removable parts. (clean the connector)
Step 4: For HP laptop: Win + B + Press Power button, when computer turned on, release all the keys, HP laptop will restore BIOS.
Audit Mode
MSI laptop locked out in audit mode
We entered into audit mode, changed the language settings and restart, the Administrator account is disabled and locked.
Restart the system, press the F3 key on the keyboard repeatedly to enter the system recovery screen.
For unknown reason it directly entered the audit mode again so we can work on it.
Note: You can press Del key to enter into BIOS.
See here for more details on how to restore the system.
BIOS
Keys to enter BIOS
- Acer: F12, F9 or Esc
- Asus: Esc or F8
- Compaq: F9 or Esc
- Dell: F12
- HP: F9 or Esc
- Lenovo: F12, F8, F10, F11
- MSI: Del, F11
- Razer Blade: F12
- Samsung: F12 or F2
- Sony: Esc or F11
- Toshiba: F12
- Republic of Games: F2 or F9
Secure Boot
When Secure Boot is enabled, you can’t install Windows.
Disable it if you need to install new Windows to the HDD.