Import vs Media
Import PPT
From File > Import > PowerPoint..., select the PPT file
- You must install Microsoft PowerPoint 2016 or greater in order to import PowerPoint file
- The imported JPG image files will be in
Media\Importfolder - Each image has a random unique name(v7.9.2)
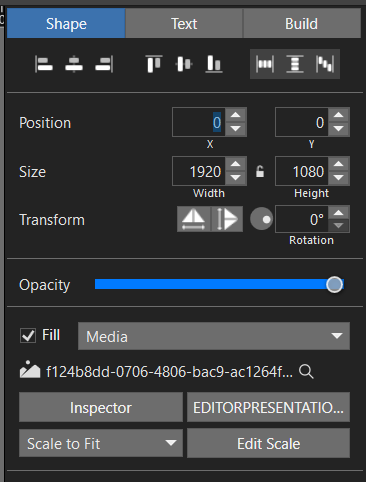
- The image is as
FillMediain the presentationShapetab
Image full path for imported file example:
C:\Users\angan\OneDrive\Documents\ProPresenter\Media\Import\41a74ec8-78e7-4037-b7dd-dfeec8229e4b.jpg
If you delete this presentation from ProPresenter, it won’t delete the imported images from the disk. You need to delete these files manually.
Import Media
- From PowerPoint, Save PPT file as JPG image files
- From ProPresenter, Select a folder in
MEDIAsection, thenFile>Import>Media...> Select the images - The images will show out in the MEDIA folder as
CUE, the image files will stay in its original folder(no copying into ProPresenter) - When you add images into a playlist, each image will show out as an individual video in the panel(not convenient)
- To delete the image, you can right-click the image select one of these:
Delete Cueswill remove from ProPresenter onlyMove to trashwill delete cues from all ProPresenter playlists and delete the file from the hard drive
Media Action
- Convert PPT into JPG images(See below for more details)
- Create a new presentation
- Select all the images and drag them into the presentation
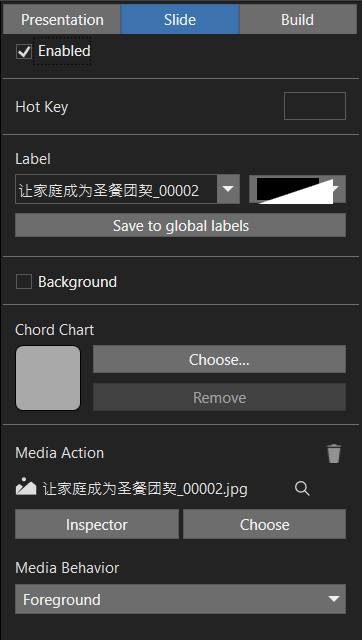
- It will add these images as Media Action to the presentation
- The images files will be in
Media\Assetsfolder
C:\Users\angan\OneDrive\Documents\ProPresenter\Media\Assets\Slide1.jpg
How to convert PPT into JPG images?
PowerPoint Desktop
- Open the PPT file from PowerPoint 365 Desktop > Save a Copy > JPEG Interchange Format(.JPG)
One Drive
- Open the PPT file from OneDrive > File > Save As > Download as Images
Online Service
- Use online service such as https://cloudconvert.com/pptx-to-jpg
Warning: File already exist(For ProPresent 6)
PowerPoint desktop, PowerPoint in OneDrive and most PPT to JPG online services will name the images as Slide1.jpg, Slide2.jpg, etc.
If you import these files or drag them into ProPresenter, most likely there’re other files with the same names already imported into the folder.
ProPresenter will ask if you want to Use Exist, New Version, or Write Over. Don’t choose any of them.
I suggest to rename these files with a prefix like “YYYYMMDD-xxx-Slide1.jpg”
20220318 Sermon_00001.jpg
How to rename multiple file names?
From Windows PowerShell
cd <your directory>
dir | Rename-Item -NewName {$_.Directory.Name + " - " + $_.Name}
// dir | Rename-Item -NewName {"20220928 Sermon-" + $_.Name
From CMD prompt
for %a in (*.*) do ren "%a" "prefix - %a"
You can also rename in File Explore by select all the files and press F2, type a MySlide.jpg, all the files will changed to MySlide(1).jpg, MySlide(2).jpg, etc. Be careful that the slides order may different from you presentation order. Prefer to use the above commands to rename files.
See here on how to rename multiple files in Mac See here on how to rename multiple files on Windows 10
Image Resolution
See https://docs.microsoft.com/en-us/office/troubleshoot/powerpoint/change-export-slide-resolution
Interface
Library
All your presentations should be in the library. You can create folders in the library to organize your presentation. Such as Songs, Sermons, etc.
Playlist
Playlist is used to organize the presentations used for an individual event or show.
Playlist can have headers, presentations, songs, announcement, etc.
To add a presentation into the playlist:
- Select the playlist
- Search(Ctrl+F) your library
- Select the desired presentation
- Press Ctrl+Enter to add it into your playlist (or drag and drop by mouse)
Look & Theme
How to change looks?
See Automatically changing your looks and themes in ProPresenter 7
Live Stream
How to live-stream to YouTube?
Schedule a live stream event from YouTube
- YouTube > Go Live > Schedule Stream > Fill in Title, Description > Select Visibility and set the date and time > Done
- The scheduled event will show out. Click
Shareicon to copy the link or send message to social medias. - Copy the
Stream URL(rtmp://a.rtmp.youtube.com/live2) andStream Keyand paste them into ProPresenter.
Note: You can also get the link from Manage tab, hover and click the Option icon beside the scheduled video > Get sharable link
Setup ProPresenter Capture Settings
- ProPresenter > Click
Live> SelectCapture Settings...> Fill in theStream URLandStream Key - Start Capture
How to live-stream to Facebook?
First, go to Facebook > Login > Live Video > Go live > Stream Setup
- From
Select a video sourcesection, SelectStreaming software Copy
Stream key(FB-165…-0-Ab…)- Click
Advanced Settings> CopyServer URL(rtmps://live-api-s.facebook.com:443/rtmp/)
Note: Once you start to preview the broadcast you have up to 5 hours to go live.
Then, Go to ProPresenter, click Live and select Capture Settings...
- Source: (Select the Screen output to Facebook)
- Destination: RTMP
- Address: rtmps://live-api-s.facebook.com:443/rtmp/
- Key: FB-165…-0-Ab…
- Encoding: 720p30(2.5 Mbps or any one of them)
- Start Capture
Go to Facebook Dashboard, check the video, audio quality and click Go live
After the event, go to ProPresenter, click Live and Stop Capture
How to live stream to YouTube and Facebook at the same time?
Use NDI to send screen capture to local network. Use two computers with OBS NDI plugin installed and add the ProPresenter NDI output as OBS source. Set up one OBS to streaming to YouTube and another to Facebook.
Or use [restream.io] service.
How can I show ProPresenter slides in Zoom?
Method 1: Using Zoom Screen Share
From ProPresenter
- Select your presentation
- Click
Audiencebutton (orCtrl + 1)to show the slide on the screen - Use right arrow key to go to next slide or left arrow key to go to previous slide
- Click
Xbutton (or pressCtrl + 1again) to exit full screen presentation
From Zoom
- Click
Share Screenbutton, selectscreen - (Option)Check
Share soundif you play music - Click
Share
Method 2: Using NDI
In ProPresenter:
- Screens > Screen Configuration > Audience >
+> New NDI Screen > Name: Pro-NDI-Screen (Option: Enable Alpha Key for lyrics overley) - (Option) Preferences > Input > Add new video input source > Set it’s audio if the video source comes with audio
- (Option) Preferences > Audio > SDI & NDI > Enable (Check Enable if you want to send audio together with NDI video)
- (Option) Screens > Edit Looks > (Setup looks for the NDI screen output)
NDI Webcam Input can send NDI to your webcam apps like Zoom.
It will convert any NDI video and audio signal on your network as a webcam source.
- Run
NDI Webcam Inputand select the ProPresenter NDI screen as source - (Option) Set audio output from
NDI Webcam Input
In Zoom:
- Zoom Audio: Select a Microphone >
Line (NewTek NDI Audio) - Zoom Video: Select a camera >
NewTek NDI Video - (Option) Zoom Settings(Or right click the zoom video screen) > Background & Filters > Check/Uncheck
Mirror my video
FAQ
How to use audio?
See Working With Audio in ProPresenter 7
How to select multiple slides?
You can select multiple slides in Show mode.
To select multiple slides which are continuous, select the first slide, hold down the Shift key and select the last slide in the group.
To select multiple slides which are not continuous hold down the Ctrl key and click on each slide.
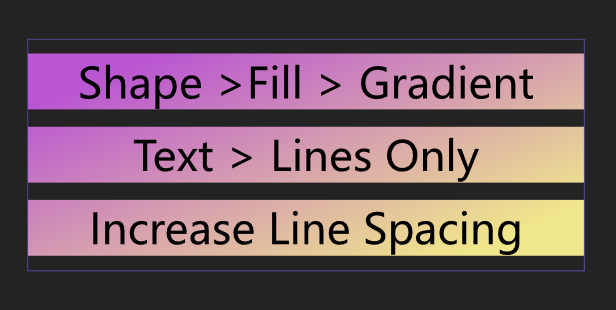
How to create lyric slides like this?
- In
Editmode fromShapetab, selectFill>Gradient, choose the desired colors and angle - From
Texttab, selectLines Only>Full Width - Set
Line SpaceorLine Heightby clicking the polygon icon
Note: You can also fill with media files like some background images, church logos, etc.
How to use Reflow editor?
Split a slide:
While editing text, if you would like to break a slide into multiple slides
you can use the Insert Slide Break feature.
First, put the cursor where you would like the text to break between slides,
then either click the Insert Slide Break button on the lower left or
press Option-Return on Mac or Ctrl + Enter on PC.
This will create a new slide and move any text that is below the cursor to the next slide.
Merge two slides:
Put the cursor at the beginning of the second slide and press Backspace on PC(or Delete on Mac) will merge the two slides together.
How to change text style across multiple slides?
Method 1:
Copy Style- Better for few individual slides- In
Editmode, select the Text object with the desired style, - Select
Texttab in Object Properties tabs, clickCopy Style - Click the slide you want to apply the style
- Select the Text box, click
Paste Stylein theTexttab
- In
Method 2:
Copy Text Style- For multiple slides in the same presentation- In
Showmode, select the desired slide and clickCopy Text Stylefrom context menu - Select multiple slides and click
Paste Text Stylefrom the context menu
- In
Method 3: Applying Themes - For one presentation or more presentation
- Select the presentation, click on the Theme dropdown menu in the toolbar.
- Click on the Theme Slide you want to use from the list.
- Doing so will update all of the slides in your presentation.
- You can also select multiple presentations and use this method to change several presentations at once.
Working with theme
Themes allow you to quickly define a set of styles for your slides.
To create a new theme, click the Theme icon and selecting New Theme, name your new Theme and Save will open the Theme Editor.
You can add as many Theme Slides as you wish within a Theme.
How to create a new theme by using a slide?
If you build a slide you’d like to save as a Theme Slide in a Theme,
- Right-click on the Slide and going to
Themes..., - Selecting the Theme you wish to put this slide under and then choosing
Add Selection to Theme
Shortcuts
Undo: Ctrl+Z
Redo: Ctrl+Y (Shift+Command+Z)
Cut: Ctrl+X
Copy: Ctrl+C
Copy Text Style: Alt+Shift+C
Paste: Ctrl+V
Paste and Match Style: Alt+V (Option+Shift+Command+V)
Paste Text Style: Alt+Shift+V
Duplicate: Ctrl + D
Edit: Ctrl + E
Delete: Del
Select All: Ctrl + A
Search: Ctrl + F

New Presentation: Ctrl + N
Save: Ctrl + S

Open Bible: Ctrl+Alt+B (Ctrl+B)
Save Bible search as a new document: Command+Ctrol+S

Preference: Ctrl+comma
Configure Screens: Ctrl+Alt+1
Toggle the Main Output On/Off: Ctrl+1
Toggle the Stage Display On/Off: Ctrl+2
Toggle Preview Screen between Output and Stage Display

Clear All: F1
Clear Slide: F2
Clear Media: F3
Clear Props: F4
Clear Audio: F5
Clear Message: F6
Clear Announcement: F7

Tighten Character Spacing: Ctrl + Shift + [ (Option + Command + [)
Loosen Character Spacing: Ctrl + Shift + ] (Option + Command + ])
Make Bigger: Ctrl + Plus(+)
Make Smaller: Ctrl + Minus(-)
Fit Slide Into Edit Window: Ctrl + 0

Hide ProPresenter: Ctrl + H
Quit ProPresenter: Ctrl + Q

Key Mapping: Alt + K
Screen
How to show slides on my second screen(an HDMI projector)?
- (Windows) Configure the second screen as
extendthe primary screen - (ProPresenter)Create an Audience screen for the projector:
Screens > Configure Screens… > Click+to add theBMH HDMIprojector screen - Show a slide and click the
Audiencetoggle button in the top right corner of the screen to show or hide the Audience Screen
How to create a multi-view layout?
See here
- Screens > Configure Screens… > Create a placeholder view in Stage section and name it as
VirtualStage - Stage Editor > Add a new Blank Layout > Rename the layout to
Multi-Layoutor any name - Add views into
Multi-Layoutby clicking+on the view > Select fromScreen Previewor other elements > repeat the last step to add more previews and arrange them > Close - Click
Showbutton > Select a slide > Click the down arrow below the Preview window > SelectVirtualStage - From
Screenmenu > SelectVirtualStage> Change stage layout toMulti-Layout


